
Almost 8 years ago, I decided that I wanted to learn more about computers and how they work under the hood. As a way of achieving this knowledge, I started a new project: designing and building a homebrew computer from scratch. Throughout the years, I built several prototypes and spent a tremendous amount of time learning how computers work. In 2022, I finally had a fully working prototype, which made it possible for me to start designing a full system.
Since PCB manufacturing is expensive and I want easy upgradability down the road, I chose a modular design. The system is designed around the eurocard format (160mm x 100mm PCB) with a custom bus design.
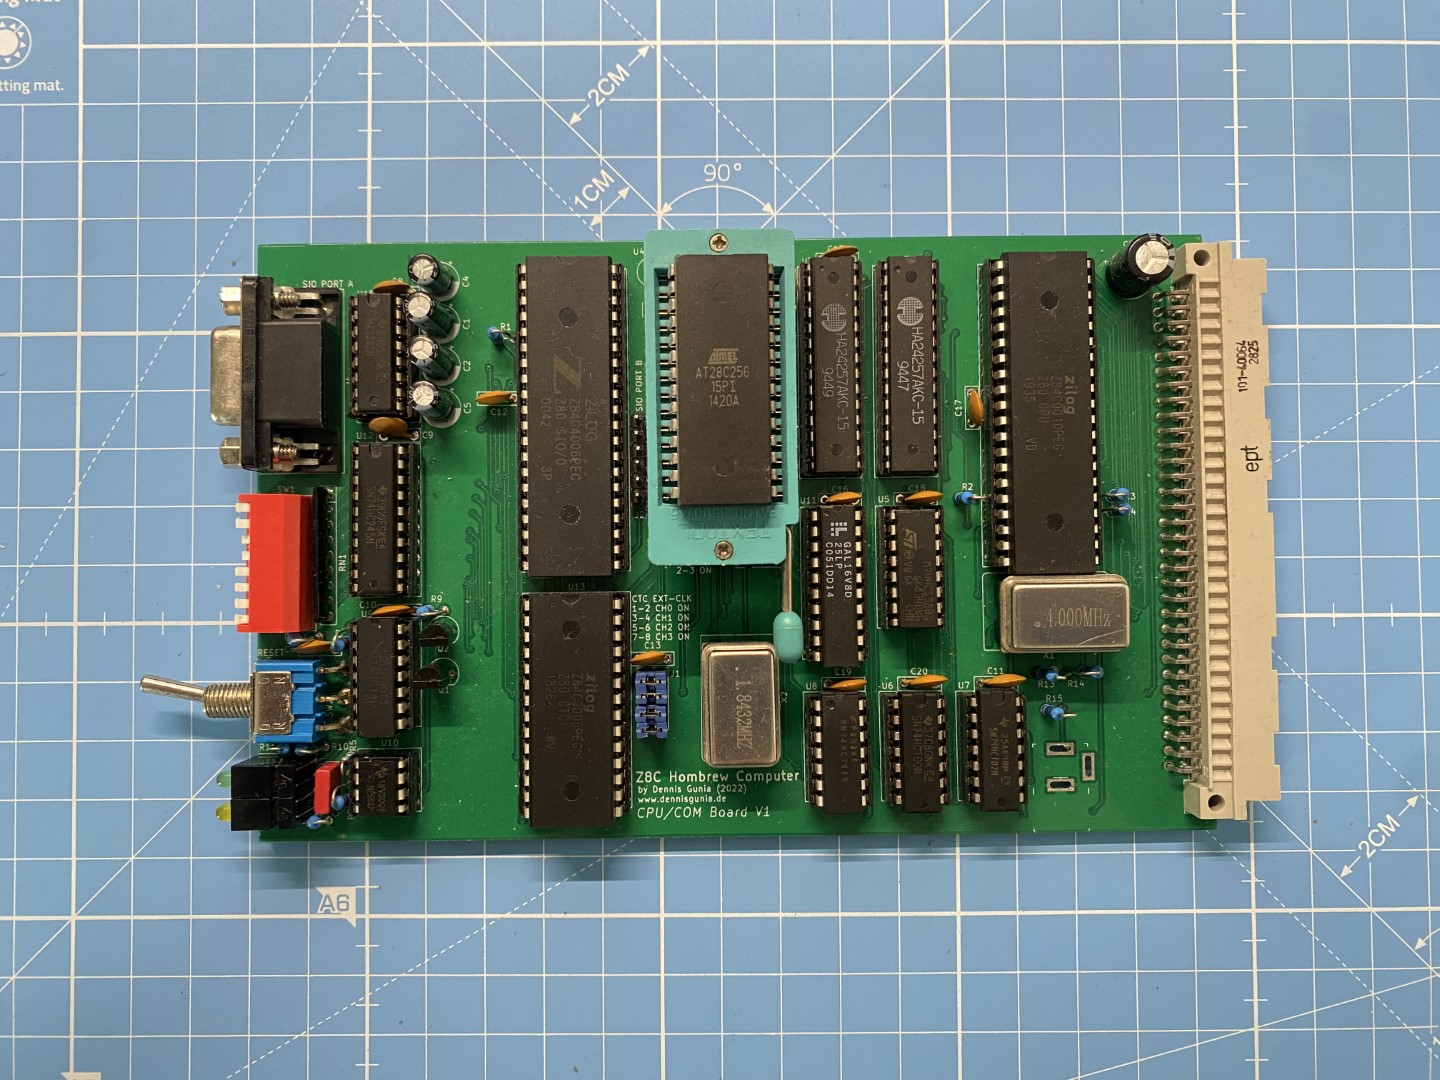
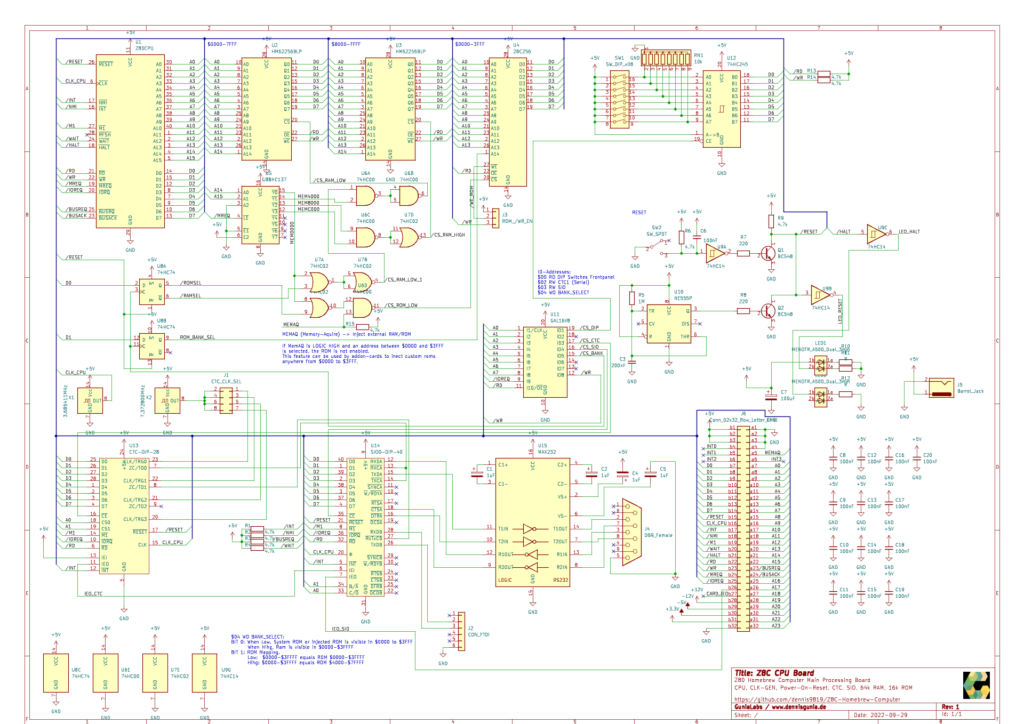
The first PCB is the CPU/COM board. It works as a single-board computer but can be expanded via the bus connector. Its specs are as follows:
- Z80 ZPU @ 4MHz
- 64 KiB SRAM
- 32 KiB EEPROM (R/W switchable)
- Z80 CTC with external 1.8432MHz Clock switchable per channel
- Z80 SIO (Up to 115200 BAUD possible @ X16 SIO prescaler)
- 1 FTDI Connector
- 1 RS232 DSUB-9 Port
- 8 front-facing DIP switches (currently used for baud-rate setup)
- Power-On-Reset Circuit and reset switch
- Indicator for Power, Halt and Reset
To get the full 64k of RAM in addition to the ROM, I decided to add a simple bank-switching mechanism using IO-Port 0x00.
       Default ($00 = 0x00)  Mode 1 ($00 = 0x02)  Mode 2 ($00 = 0x01)
$0000 +--------------------+--------------------+--------------------+
      | EEPROM Lower 16KiB | EEPROM Upper 16KiB | SRAM               |
$4000 +--------------------+--------------------+                    |
      | SRAM               | SRAM               |                    |
      |                    |                    |                    |
      |                    |                    |                    |
$FFFF +--------------------+--------------------+--------------------+

Note: In default mode and mode 1, the MEMAQ pin (pin a5 on backplane)
      can be used to inject an external memory device in the $0000-$3FFF
      window.

IO Addresses:
$00 Memory register
$01 DIP Switches
$04 CTC (First address)
$08 SIO (First address)
The CPU Card is now fully functional and successfully runs a version of my monitor, along with Microsoft BASIC (although keyboard interrupt support is not yet implemented).
This project has been an incredible learning experience. But this is just the beginning of an exciting adventure, and there is much more to come.
My immediate focus is on expanding the capabilities of the system. Firstly, I will be adding the Floppy and HDD module, which will enable seamless storage and retrieval of data, programs, and files.
Following that, I am excited to integrate the Keyboard module, allowing direct interaction with the computer through a terminal. Additionally, in the near future, I plan to eliminate the need for a terminal by incorporating a VDP (Video Display Processor). I am currently considering options such as the V9958 or a custom GPU based on the HD46505, but I am open to exploring other possibilities as well.
Last but not least, my vision includes the addition of a sound module featuring several famous Sound-Chips and a MIDI interface. This will not only enhance the computer’s capabilities but also make the project a powerful tool for my other passion: making music.
As this journey unfolds, I am committed to providing comprehensive documentation, sharing every step and breakthrough with fellow enthusiasts. The road ahead may present challenges, but I am eagerly looking forward to conquering them and pushing the boundaries of what this homebrew computer can achieve.
Feel free to check out the project on github:
The schematics provided herein are intended for informational purposes only. The information contained in these schematics is provided „as is,“ with no guarantee of completeness, accuracy, or suitability for any particular purpose. The user assumes full responsibility for any use of the schematics and acknowledges that any reliance on the information provided is at their own risk.